PINNED - Lithium battery conversion/info
Re: Step by step lithium conversion?
![]() by rustyjames » 28 Jul 2017, 02:25
by rustyjames » 28 Jul 2017, 02:25
- rustyjames
- Posts: 927
- Joined: 12 Dec 2011, 17:59
- Location: Central New Jersey, USA
Re: Step by step lithium conversion?
![]() by hotwheels_75 » 28 Jul 2017, 14:44
by hotwheels_75 » 28 Jul 2017, 14:44
- hotwheels_75
- Posts: 395
- Joined: 25 May 2010, 21:33
Re: Step by step lithium conversion?
![]() by snaker » 01 Aug 2017, 09:29
by snaker » 01 Aug 2017, 09:29
The battery cells are as underneath. The hole/screw size is M6 (6mm diameter). I need both insulated (terminals with adhesive heat shrink tubes) and non-insulated ring terminals.That's because a friend advises terminals should be soldered after crimping (is he right?). Insulated ones will be used for crimping only, non-insulated ones for crimping+soldering. I will try the non-insulated ones first, If soldering is not properly done, I will switch to the insulated ones.
So my needs are:
1. Insulated ring terminals M6 for 6/8/10/12/22 AWG wires.
2. Nom-insulated ring terminals M6 for 6/8/10/12/22 AWG wires.
I can buy from digikey.com or mouser.com. Or I just need to know the code names or pics of them.
- snaker
- Posts: 1259
- Joined: 23 May 2015, 10:45
- Location: Vietnam
Re: Step by step lithium conversion?
![]() by Burgerman » 01 Aug 2017, 09:58
by Burgerman » 01 Aug 2017, 09:58
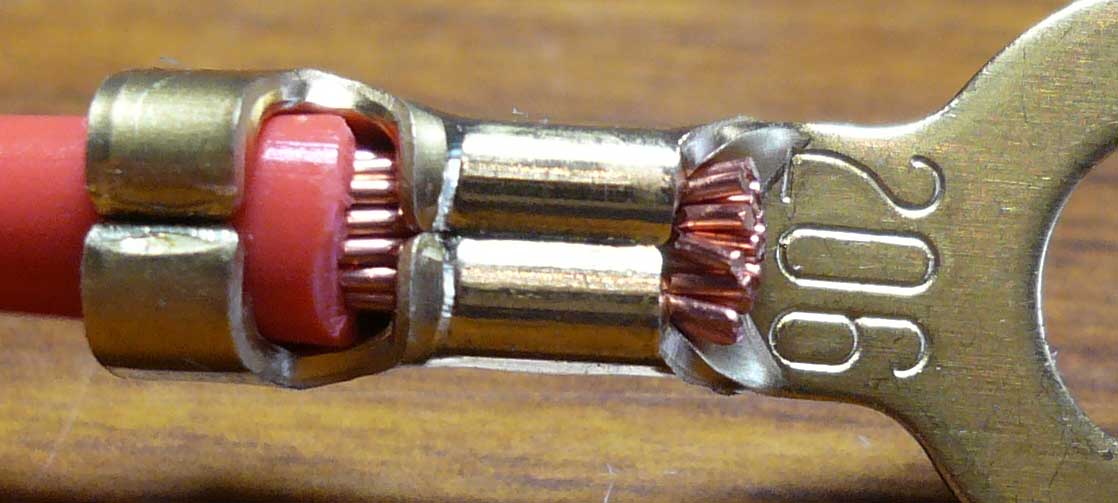
Crimping, on these commonly available terminals is a joke. There is inadequate wall thickness. Once its crimped, air can get in and cause corrosion. Worse you can pull the crimp off and often with little effort. They are just made from a bit of thin soft copper tube.
You want: 10 sq mm cable, 6mm stud. http://www.ebay.co.uk/itm/Crimp-or-Sold ... MNxFyXH0QA
Or for 5mm cable you want these, with 6mm stud. http://www.ebay.co.uk/itm/6mm-Battery-S ... NXL0dSXYDg
Then buy adhesive heat shrink, that covers every bit but the whole you put the bolt in!
SMALL wires can be crimped securely in a professional system that is in a production environment http://www.easternbeaver.com/Main/Elec_ ... -crimp.jpg
Unless you can find some real heavy crimp terminals, like this http://static.baxters.com.au/media/cata ... 0/00sp.jpg and I never could! Those can be crimped airtight on heavy wires.
You need a small gas torch, and a crimper to close it up tight to solder with capillary action well.
http://www.wheelchairdriver.com/crimp-solder.htm this is what I do.
-

Burgerman - Site Admin
- Posts: 71098
- Joined: 27 May 2008, 21:24
- Location: United Kingdom
Re: Step by step lithium conversion?
![]() by snaker » 01 Aug 2017, 10:39
by snaker » 01 Aug 2017, 10:39
- snaker
- Posts: 1259
- Joined: 23 May 2015, 10:45
- Location: Vietnam
Re: Step by step lithium conversion?
![]() by shirley_hkg » 02 Aug 2017, 03:37
by shirley_hkg » 02 Aug 2017, 03:37
- shirley_hkg
- Posts: 4656
- Joined: 31 Dec 2010, 13:42
Re: Step by step lithium conversion?
![]() by snaker » 02 Aug 2017, 09:38
by snaker » 02 Aug 2017, 09:38
- Attachments
-
- snaker
- Posts: 1259
- Joined: 23 May 2015, 10:45
- Location: Vietnam
Re: Step by step lithium conversion?
![]() by Burgerman » 02 Aug 2017, 10:20
by Burgerman » 02 Aug 2017, 10:20
-
Burgerman - Site Admin
- Posts: 71098
- Joined: 27 May 2008, 21:24
- Location: United Kingdom
Re: Step by step lithium conversion?
![]() by snaker » 04 Aug 2017, 04:12
by snaker » 04 Aug 2017, 04:12
- snaker
- Posts: 1259
- Joined: 23 May 2015, 10:45
- Location: Vietnam
Re: Step by step lithium conversion?
![]() by shirley_hkg » 04 Aug 2017, 07:18
by shirley_hkg » 04 Aug 2017, 07:18
Look closely what other people do .
- Attachments
-
- shirley_hkg
- Posts: 4656
- Joined: 31 Dec 2010, 13:42
Re: Step by step lithium conversion?
![]() by snaker » 04 Aug 2017, 08:34
by snaker » 04 Aug 2017, 08:34
- snaker
- Posts: 1259
- Joined: 23 May 2015, 10:45
- Location: Vietnam
Re: Step by step lithium conversion?
![]() by shirley_hkg » 04 Aug 2017, 09:32
by shirley_hkg » 04 Aug 2017, 09:32
snaker wrote:. I intend to remove that nylon so I can put batteries close side-by-side in the battery box and precisely measure the connection bars. Is there any problem if batteries are naked without nylon wrappers.
Instead , additional insulation should be induced .
The blue shrink wrap is very vulnerable .
Seller asks user to put at least 0.5mm barley paper around cell , to avoid short circuit
Never forget to insulate the bottom of your battery box too .
- shirley_hkg
- Posts: 4656
- Joined: 31 Dec 2010, 13:42
Re: Step by step lithium conversion?
![]() by Burgerman » 04 Aug 2017, 09:49
by Burgerman » 04 Aug 2017, 09:49
Or Wrap each neatly in duct tape, then, use some of that plastidip stuff on every one to hide it, seal it, and add extra insulation.
youtu.be/DwHglysGMDE
-
Burgerman - Site Admin
- Posts: 71098
- Joined: 27 May 2008, 21:24
- Location: United Kingdom
Re: Step by step lithium conversion?
![]() by snaker » 04 Aug 2017, 11:01
by snaker » 04 Aug 2017, 11:01
https://world.tmall.com/item/5244464044 ... 1087688462
- snaker
- Posts: 1259
- Joined: 23 May 2015, 10:45
- Location: Vietnam
Re: Step by step lithium conversion?
![]() by Burgerman » 04 Aug 2017, 11:16
by Burgerman » 04 Aug 2017, 11:16
-
Burgerman - Site Admin
- Posts: 71098
- Joined: 27 May 2008, 21:24
- Location: United Kingdom
Re: Step by step lithium conversion?
![]() by Burgerman » 04 Aug 2017, 11:24
by Burgerman » 04 Aug 2017, 11:24
Then slip each into a accurately fitting plastic bag.
And then tape the whole pack tightly together.
Use an insulating layer of plastic on the base too.

-
Burgerman - Site Admin
- Posts: 71098
- Joined: 27 May 2008, 21:24
- Location: United Kingdom
Re: Step by step lithium conversion?
![]() by Gnomatic » 04 Aug 2017, 21:19
by Gnomatic » 04 Aug 2017, 21:19
Burgerman wrote:Interestingly the headway style cells casing does not appear to be connected to the plus or minus.
Scraping the blue coating of a Headway cell on chair bolts on each side of a Headway pack simultaneously, is not something you want to happen. Don't ask me how I know this.
- Gnomatic
- Posts: 2124
- Joined: 24 Aug 2012, 17:18
- Location: Ohio USA
Re: Step by step lithium conversion?
![]() by Burgerman » 04 Aug 2017, 23:43
by Burgerman » 04 Aug 2017, 23:43
-
Burgerman - Site Admin
- Posts: 71098
- Joined: 27 May 2008, 21:24
- Location: United Kingdom
Re: Step by step lithium conversion?
![]() by snaker » 05 Aug 2017, 02:09
by snaker » 05 Aug 2017, 02:09
Here are my thoughts, please check if where I am wrong?
I see the electric only goes out from 2 holes on each battery. And these 2 poles are isolated from the metal shell (through a rubber ring). So if a battery stands alone, it is completely safe. Even if all the blue nylon covers are removed and the batteries are put side by side, they are still safe as long as they are not connected. The problem only comes when they are connected. That's because after connected, the top of screws or the copper bars might touch the box. If the box is not well insulated, that causes a short circuit and the pack gets burned. To prevent this danger, I only need to wrap the pack by a thick duct tape after connecting batteries. I have to ensure no metal part is open to the outside.
- snaker
- Posts: 1259
- Joined: 23 May 2015, 10:45
- Location: Vietnam
Re: Step by step lithium conversion?
![]() by Burgerman » 05 Aug 2017, 02:27
by Burgerman » 05 Aug 2017, 02:27
Use a multimeter. See if the case is the same as the negative. It will probably be so, according to shirley.
-
Burgerman - Site Admin
- Posts: 71098
- Joined: 27 May 2008, 21:24
- Location: United Kingdom
Re: Step by step lithium conversion?
![]() by Gnomatic » 05 Aug 2017, 03:26
by Gnomatic » 05 Aug 2017, 03:26
Burgerman wrote:So they are connected.The can is neg or pos?
Not sure. Just know if you do what I described, lots of sparks, and the cell on each side of the pack that got scraped will have a small hole in the casing where the aluminium was melted through! With electrolyte bleeding out of it.
I think the casing is the pos but don't quote me on that.
- Gnomatic
- Posts: 2124
- Joined: 24 Aug 2012, 17:18
- Location: Ohio USA
Re: Step by step lithium conversion?
![]() by shirley_hkg » 05 Aug 2017, 04:41
by shirley_hkg » 05 Aug 2017, 04:41
snaker wrote:My battery box is too small. If adding just a couple of mm tape, the pack cannot fit the box.
You are doing 2P8S right ?
An 2P pair can be regarded as 1 , so need no EXTRA insulation .
I only put thin paper cardboard between adjacent cells , and stuck stuff in , to fill up any excess void in battery box . That prevents the cells rubbing each others .
- shirley_hkg
- Posts: 4656
- Joined: 31 Dec 2010, 13:42
Re: Step by step lithium conversion?
![]() by snaker » 05 Aug 2017, 09:47
by snaker » 05 Aug 2017, 09:47
I just meter the batteries, the metal case is positive. I cannot understand why they can invent this danger. The batteries must have thick plastic or at least durable silicon covers instead of thin and weak nylon.
- snaker
- Posts: 1259
- Joined: 23 May 2015, 10:45
- Location: Vietnam
Re: Step by step lithium conversion?
![]() by Burgerman » 05 Aug 2017, 10:50
by Burgerman » 05 Aug 2017, 10:50
-
Burgerman - Site Admin
- Posts: 71098
- Joined: 27 May 2008, 21:24
- Location: United Kingdom
Re: Step by step lithium conversion?
![]() by shirley_hkg » 05 Aug 2017, 11:00
by shirley_hkg » 05 Aug 2017, 11:00
Take a breath and think thoroughly what can be done ; anything on the battery box / compartment .
- shirley_hkg
- Posts: 4656
- Joined: 31 Dec 2010, 13:42
Re: Step by step lithium conversion?
![]() by Burgerman » 05 Aug 2017, 11:14
by Burgerman » 05 Aug 2017, 11:14
This is why I and Shirley always stress that its important to maximize Ah or at least use high C rate cells.
-
Burgerman - Site Admin
- Posts: 71098
- Joined: 27 May 2008, 21:24
- Location: United Kingdom
Re: Step by step lithium conversion?
![]() by steves1977uk » 05 Aug 2017, 14:55
by steves1977uk » 05 Aug 2017, 14:55
Steve
-

steves1977uk - Posts: 4400
- Joined: 20 Oct 2011, 21:47
- Location: Wells next the Sea, Norfolk, UK
Re: Step by step lithium conversion?
![]() by Burgerman » 05 Aug 2017, 16:19
by Burgerman » 05 Aug 2017, 16:19
That said, all lithium cells prefer to be charged and discharged at a lower rate. The 1500 cycles testing is done at 0.2 or 0.3C typically. Likewise for best service life a charge rate of around 1/5th to 1/3rd capacity is best.
So when charging you CAN charge at up to 5C on a headway. So that would mean max charge rate on a 50Ah pack would be 250 Amps! But a 50Ah battery is still going to thank you with a longer service life if charged at 0.2C to 0.3C or 10 to 15A.
So if time allows, charge slowly. If you are in a hurry, dont fret, turn the charger up to max. 40A isnt that high.
-
Burgerman - Site Admin
- Posts: 71098
- Joined: 27 May 2008, 21:24
- Location: United Kingdom
Re: Step by step lithium conversion?
![]() by snaker » 17 Aug 2017, 03:14
by snaker » 17 Aug 2017, 03:14
Burgerman wrote:You want: 10 sq mm cable, 6mm stud. http://www.ebay.co.uk/itm/Crimp-or-Sold ... MNxFyXH0QA
Or for 5mm cable you want these, with 6mm stud. http://www.ebay.co.uk/itm/6mm-Battery-S ... NXL0dSXYDg
BM, your recommended ring terminals are zinc plated. I cannot find sellers of that zinc plating type. I only find Molex ones which are tin plated. Can I apply your soldering style on tin plated ones? I mean if there is any problem when heating tin plated terminals through a gas torch?
http://www.mouser.vn/ProductDetail/Mole ... TpMGITs%3d
- snaker
- Posts: 1259
- Joined: 23 May 2015, 10:45
- Location: Vietnam
Re: Step by step lithium conversion?
![]() by Burgerman » 17 Aug 2017, 07:50
by Burgerman » 17 Aug 2017, 07:50
-
Burgerman - Site Admin
- Posts: 71098
- Joined: 27 May 2008, 21:24
- Location: United Kingdom
Return to Everything Powerchair
Who is online
Users browsing this forum: Burgerman, duke1, saker98, tettralytic, tnt and 487 guests