the results from a 23 mile ride today - with both the 30ah ADD ON connected to the 105ah pack
the ADD ON only used up about 10ah - Plenty left -
PINNED - ADD ON PACK Step By Step 30ah Pack build / pictures
Re: Step By Step 30ah Pack build with pictures
![]() by expresso » 02 Jun 2017, 01:19
by expresso » 02 Jun 2017, 01:19
Quickie 636 - 230ah LifePo4
- expresso
- Posts: 11985
- Joined: 10 May 2010, 03:17
Re: Step By Step 30ah Pack build with pictures
![]() by expresso » 02 Jun 2017, 01:24
by expresso » 02 Jun 2017, 01:24
i left the ADD on for a while longer to soak up the cells better - i also did it a little longer for the 105 ah pack - i lowered the Term. point - to get them all full and balanced -
i put it back to the original term. point- i should be using this chair often now the warmer days are coming -
the ADD ON is about 100mAh - and the full pack is 200mAh - for this time only i put the ADD ON at 10mAh and 2 hour CV cutoff in case - and the Full pack at 100mAh - same 2 hour CV cut off -
they both finished on there own - didnt cut off - returned to original settings and should be fine now its going to be used often daily once weather is warmer
Quickie 636 - 230ah LifePo4
- expresso
- Posts: 11985
- Joined: 10 May 2010, 03:17
Re: Step By Step 30ah Pack build with pictures
![]() by Burgerman » 02 Jun 2017, 01:27
by Burgerman » 02 Jun 2017, 01:27
You replaced 10 + 40Ah. But you always put 5% or more back extra due to losses. So you used around 46Ah.
From what? 135Ah? So you covered a fraction over 33% of your possible range. So 23 3 miles, less about 5%. So 60 miles range.
From what? 135Ah? So you covered a fraction over 33% of your possible range. So 23 3 miles, less about 5%. So 60 miles range.
-

Burgerman - Site Admin
- Posts: 71120
- Joined: 27 May 2008, 21:24
- Location: United Kingdom
Re: Step By Step 30ah Pack build with pictures
![]() by expresso » 02 Jun 2017, 15:47
by expresso » 02 Jun 2017, 15:47
makes a huge difference that little extra 30ah - i charge at a slower rate and still finish faster because each pack gets charged on its own and finish about the same time more or less - i use 20A for the full in chair pack - and 12A for the 30ah pack - works out pretty much perfect -
this has been discussed before - CELL MONITOR -
let me say this again to be clear - I am not using one at the moment - at least not with this 135ah pack - i dont think i will get low enough in a day to worry about it - BUT - I Will still make a Cell monitor with the Sub d connector later on - just to see how it works - i am just not in a Rush to do that now -
BUT anyone making a ADD ON and want to make sure they dont get too low - they should make a Cell Monitor to be safe - i have used my ADD ON with Lead without one - i havnt had any issues - Never get in the RED and you SHOULD BE OK -
i am curious to know also and will make it ONE Day and connect to the ADD ON Chair with Lead - just to see how it works etc, - its simple enough - use the same Sub D and just solder in the balance wires with cell monitor on the end - then connect to the charge cable from the ADD ON pack - make it long enough to reach you in your seating position so you can check them -
also - add in a Toggle switch to the wiring so its not draining the battery all the time - when you want to check it - toggle it on - check and toggle it off - when i make one - i will post the pics here to show you how its done - - if you can make the Charge cable - you can make the Cell monitor -
Quickie 636 - 230ah LifePo4
- expresso
- Posts: 11985
- Joined: 10 May 2010, 03:17
Re: Step By Step 30ah Pack build with pictures
![]() by Gnomatic » 02 Jun 2017, 20:01
by Gnomatic » 02 Jun 2017, 20:01
So, if the ADD ON on a lead brick chair gets down to 2.9v/cell, then both the ADD ON pack and lead bricks are at 23.2v, correct?
When a lead brick chair reaches 23.2v, about what % of available capacity is left in the lead bricks?
When a lead brick chair reaches 23.2v, about what % of available capacity is left in the lead bricks?
- Gnomatic
- Posts: 2124
- Joined: 24 Aug 2012, 17:18
- Location: Ohio USA
Re: Step By Step 30ah Pack build with pictures
![]() by Burgerman » 02 Jun 2017, 20:16
by Burgerman » 02 Jun 2017, 20:16
Hopefully neither will ever reach that level in use!
A lead brick that reads 12V for eg could be 90 percent discharged. OR:
Reads 12V. Battery thats FULL, but just been driven up a steep hill. And you are seeing voltage depression caused by the surface charge chemicals being used up due to high amps for a say 10 mins. Where they interface the acid/plate surface they are used up. This is peukert. It may now actually be 70% full. Over the next 24 hours it will recover its voltage up to approx 12.7V. As the chemicals re-distribute, and the outer parts of the plate are "recharged" by the deeper materials.
Also reads 12V: One that is 95 percent discharged, but has just had a trip down a hill, or been on a charger for 1 minute. Its voltage will fall over the next 24 hours to around a stable 11.6V
In other words nobody can ever know state of charge unless its a wet battery (hydrometer) or you store it in a disconnected state for 24 hours.
Worse. The battery has resistance. So under load its voltage falls in proportion to load. And its resistance increases as it becomes more discharged, and at times of high DC current and reduces at times of charge current. As such a battery that reads say 12.2v after standing 24 hours, is say 20% charged. But it will not drive your chair more than a few yards initially regardless... So to us thats fully discharged.
The voltage of the lithium does almost non of this peukert, and changes resistance only slightly, under load, and as it becomes discharged. So what it reads is basically what you get. But temperature has a large affect instead.
-
Burgerman - Site Admin
- Posts: 71120
- Joined: 27 May 2008, 21:24
- Location: United Kingdom
Re: Step By Step 30ah Pack build with pictures
![]() by expresso » 02 Jun 2017, 21:53
by expresso » 02 Jun 2017, 21:53
Gnomatic wrote:So, if the ADD ON on a lead brick chair gets down to 2.9v/cell, then both the ADD ON pack and lead bricks are at 23.2v, correct?
When a lead brick chair reaches 23.2v, about what % of available capacity is left in the lead bricks?
If i can recall - after doing the 25 mile ride with Lead - ADD ON etc, - the pack volt was 25v - when i got home and plugged it in the PL8 to charge -
maybe maybe it could have been also 24.8v it was in that area - i say 25.6v if i recall - i was in the Orange at this point - and home already
if i follow the colors on the joystick - i feel i am safe - but not get in the RED - i dont think it would go lower enough to hit 2.9v for the ADD ON -
but i could be wrong
Quickie 636 - 230ah LifePo4
- expresso
- Posts: 11985
- Joined: 10 May 2010, 03:17
Re: Step By Step 30ah Pack build with pictures
![]() by Dan » 04 Jun 2017, 15:25
by Dan » 04 Jun 2017, 15:25
Are the cables from the pack to the charger used for anything else? Could you just run long cables from the pack to the charger than when its charged roll it up and place it in the bag with the pack?
I'm a dude playing a dude disguised as another dude.
- Dan
- Posts: 577
- Joined: 10 Nov 2011, 03:03
- Location: Northern Ireland
Re: Step By Step 30ah Pack build with pictures
![]() by expresso » 04 Jun 2017, 16:03
by expresso » 04 Jun 2017, 16:03
Dan wrote:Are the cables from the pack to the charger used for anything else? Could you just run long cables from the pack to the charger than when its charged roll it up and place it in the bag with the pack?
Yes you can do that also - you can by pass even making a Sub D connector - you can make a long cable power Leads from the PL 8 to the battery pack - and also the same with the Balance wires - using the 36 inch cables - -
you can make short cables on the Battery end - and then just plug the longer cables together and connect to the PL 8 - with no Sub D connector involved - would still work - if you wanted to do that - i would still make it a Modular cable
meaning - make a set of cables both for power and balance on the battery end - shorter - and then the longer ones you can plug them in the short battery end and run to the PL 8 - - charge and then roll it up in the bag also
the reason for the Two part cable Modular system - is just neater easier - if you needed to remove the pack - you wont have these long cables connected and in the way etc, - its a preference - you dont have to -
that would be helpful for any user who has trouble or a hard time making the Sub D - would save some money also -
Quickie 636 - 230ah LifePo4
- expresso
- Posts: 11985
- Joined: 10 May 2010, 03:17
Re: Step By Step 30ah Pack build with pictures
![]() by Hartleyhare6 » 04 Jun 2017, 17:13
by Hartleyhare6 » 04 Jun 2017, 17:13
Hello everyone I've just discovered this forum and need some help as a complete wheelchair novice/virgin. I'm a 48yr old male with MND and after nearly four years my legs are just about done! I don't want a chair with tiny white wheels and a basket I want to go off road with my kids while I still can.
The BM3 looks perfect but how much is it and how do I get one?
The BM3 looks perfect but how much is it and how do I get one?
- Hartleyhare6
- Posts: 1
- Joined: 04 Jun 2017, 12:55
Re: Step By Step 30ah Pack build with pictures
![]() by Burgerman » 04 Jun 2017, 17:18
by Burgerman » 04 Jun 2017, 17:18
You would need to build your own and learn a lot of stuff. So lets start by looking over here:
viewtopic.php?f=2&t=5624
viewtopic.php?f=2&t=5624
-
Burgerman - Site Admin
- Posts: 71120
- Joined: 27 May 2008, 21:24
- Location: United Kingdom
Re: Step By Step 30ah Pack build with pictures
![]() by Dan » 04 Jun 2017, 17:32
by Dan » 04 Jun 2017, 17:32
expresso wrote:Yes you can do that also - you can by pass even making a Sub D connector - you can make a long cable power Leads from the PL 8 to the battery pack - and also the same with the Balance wires - using the 36 inch cables - - -
I know its nowhere near as neat and tidy but after blowing of the dust from my soldering iron and trying to solder the Sub D connector I found that unfortunately I no longer have the strength or dexterity to get the job done.
I may find someone local to do it or just go down the rough and ready road of a longish lead on the pack.
I'm a dude playing a dude disguised as another dude.
- Dan
- Posts: 577
- Joined: 10 Nov 2011, 03:03
- Location: Northern Ireland
Re: Step By Step 30ah Pack build with pictures
![]() by expresso » 04 Jun 2017, 17:57
by expresso » 04 Jun 2017, 17:57
I wouldnt stress it so much - thats a great option to get it done without using a Sub D - it wont be that bad at all with a ADD ON this way - the end result is the same thing - I say do it your way - - Make it 3 feet long at least - - the balance cable is already 36 inches long - extend the power wires another foot - thats it - simple - you can use a good Butt Connector to extend the power wire also - will work fine - would be simple - easy - save money and do the same thing -
i would make it Modular - you can leave the cables in the PL 8 all the time - and just disconnect from the Pack end only - Add shorter balance wires on the Pack and power leads - you can use a XT90 connector or what ever you like - easier to disconnect and reconnect the XT90
and they stay there all the time on the Pack - when done charging - disconnect them and thats it - leave the long cables going to the PL 8 alone - and thats it - its a great idea -
Quickie 636 - 230ah LifePo4
- expresso
- Posts: 11985
- Joined: 10 May 2010, 03:17
Re: Step By Step 30ah Pack build with pictures
![]() by Gnomatic » 04 Jun 2017, 18:23
by Gnomatic » 04 Jun 2017, 18:23
Dan wrote:expresso wrote:Yes you can do that also - you can by pass even making a Sub D connector - you can make a long cable power Leads from the PL 8 to the battery pack - and also the same with the Balance wires - using the 36 inch cables - - -
I know its nowhere near as neat and tidy but after blowing of the dust from my soldering iron and trying to solder the Sub D connector I found that unfortunately I no longer have the strength or dexterity to get the job done.
I may find someone local to do it or just go down the rough and ready road of a longish lead on the pack.
No shame in getting some outside assistance. I had to get help to get the Dsubs soldered. Was happy I did. The end result was MUCH better than what I was capable of.
But as expresso said, you can get by w/o the Dsubs. It's an ADD ON pack you're building afterall, so it will probably be in a backpack or something similar anyway. No reason the charge cord can't live there too.
As expresso suggested, if you can, make it modular. Easy enough with a pair of 36" balance extension wires, and something like a couple xt60, xt90, or even Anderson connectors.
- Gnomatic
- Posts: 2124
- Joined: 24 Aug 2012, 17:18
- Location: Ohio USA
Re: Step By Step 30ah Pack build with pictures
![]() by steves1977uk » 04 Jun 2017, 18:41
by steves1977uk » 04 Jun 2017, 18:41
Also remember the less plugging/unplugging from the PL8 you do the better. So a few 36 inch extension cables and say the Revolectrix safe banana cables to a XT90 connector would be the best way to go. Leave one extension cable permanently connected to the PL8 and use the others to make a longer extension.
Steve
Steve
-

steves1977uk - Posts: 4400
- Joined: 20 Oct 2011, 21:47
- Location: Wells next the Sea, Norfolk, UK
Re: Step By Step 30ah Pack build with pictures
![]() by thebassman » 04 Jun 2017, 21:22
by thebassman » 04 Jun 2017, 21:22
Isaac Jo
Mechanical engineer/software developer/wannabe electrical engineer
2x Permobil F5/Permobil Street/Creality CR10SPro/heavily modded Ender3
Mechanical engineer/software developer/wannabe electrical engineer
2x Permobil F5/Permobil Street/Creality CR10SPro/heavily modded Ender3
- thebassman
- Posts: 85
- Joined: 13 Aug 2012, 16:06
- Location: Tri Cities WA, USA
Re: Step By Step 30ah Pack build with pictures
![]() by Burgerman » 04 Jun 2017, 22:09
by Burgerman » 04 Jun 2017, 22:09
Err, quite! But he doesn't begin to explain it. But thats what we are all doing!
-
Burgerman - Site Admin
- Posts: 71120
- Joined: 27 May 2008, 21:24
- Location: United Kingdom
Re: Step By Step 30ah Pack build with pictures
![]() by Gnomatic » 08 Jun 2017, 21:20
by Gnomatic » 08 Jun 2017, 21:20
Just poking around a bit. Found a couple of cases that could be made into nice boxes for an add-on pack. Bit expensive, but they'd do the job well.
(clicky on the pics to go to Amazon)
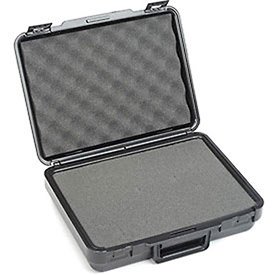
Dimensions - Outside 14 x 11 x 4 inches Inside 13-1/2"X10"X3-3/4"
(clicky on the pics to go to Amazon)
Dimensions - Outside 14 x 11 x 4 inches Inside 13-1/2"X10"X3-3/4"
- Gnomatic
- Posts: 2124
- Joined: 24 Aug 2012, 17:18
- Location: Ohio USA
Re: Step By Step 30ah Pack build with pictures
![]() by Gnomatic » 08 Jun 2017, 21:34
by Gnomatic » 08 Jun 2017, 21:34
This one is a bit bigger ........

Dimensions: Outside 17" x 12" x 4 3/8" Inside 16" x 11" x 4 1/32"
Dimensions: Outside 17" x 12" x 4 3/8" Inside 16" x 11" x 4 1/32"
- Gnomatic
- Posts: 2124
- Joined: 24 Aug 2012, 17:18
- Location: Ohio USA
Re: Step By Step 30ah Pack build with pictures
![]() by expresso » 08 Jun 2017, 22:50
by expresso » 08 Jun 2017, 22:50
Much neater than my plastic shoe box i am using they may be too thin though ? i mean from the looks - i could be wrong -
Quickie 636 - 230ah LifePo4
- expresso
- Posts: 11985
- Joined: 10 May 2010, 03:17
Re: Step By Step 30ah Pack build with pictures
![]() by Gnomatic » 08 Jun 2017, 23:17
by Gnomatic » 08 Jun 2017, 23:17
No, a pack like yours would fit in either of these. They are both over 4" wide/tall internally, depending on the orientation. Your pack is less than 3.5" wide, so either of these could accommodate your pack nicely.
- Gnomatic
- Posts: 2124
- Joined: 24 Aug 2012, 17:18
- Location: Ohio USA
Re: Step By Step 30ah Pack build with pictures
![]() by expresso » 08 Jun 2017, 23:34
by expresso » 08 Jun 2017, 23:34
nice - thats for a 30ah pack - not bad - would be neat and clean - would that fit 3 rows of Cells - 45ah pack ?
always looking for better ways and cases etc, -
always looking for better ways and cases etc, -
Quickie 636 - 230ah LifePo4
- expresso
- Posts: 11985
- Joined: 10 May 2010, 03:17
Re: Step By Step 30ah Pack build with pictures
![]() by Gnomatic » 09 Jun 2017, 00:06
by Gnomatic » 09 Jun 2017, 00:06
no, it wouldn't fit a 45Ah pack. But this one would ....
 .
.
Dimensions: External 15" x 11" x 5 1/2" Internal 14" x 10" x 5 3/16"
.Dimensions: External 15" x 11" x 5 1/2" Internal 14" x 10" x 5 3/16"
- Gnomatic
- Posts: 2124
- Joined: 24 Aug 2012, 17:18
- Location: Ohio USA
Re: Step By Step 30ah Pack build with pictures
![]() by expresso » 09 Jun 2017, 00:10
by expresso » 09 Jun 2017, 00:10
thats cutting it real close - it may need another inch or two inside length ? i dont remember how long it is -
Quickie 636 - 230ah LifePo4
- expresso
- Posts: 11985
- Joined: 10 May 2010, 03:17
Re: Step By Step 30ah Pack build with pictures
![]() by Gnomatic » 09 Jun 2017, 00:26
by Gnomatic » 09 Jun 2017, 00:26
Pack is just a bit over 13" in length, whether 30Ah or 45Ah, so it'll fit. Than case can handle anything under 14"
- Gnomatic
- Posts: 2124
- Joined: 24 Aug 2012, 17:18
- Location: Ohio USA
Re: Step By Step 30ah Pack build with pictures
![]() by expresso » 09 Jun 2017, 01:00
by expresso » 09 Jun 2017, 01:00
ok thats great then - for some reason i have 17 inchs in my head - why i dont know - i can consider that then if i do another 45ah later on for the bounder 
drill the case for the wires to snake out - charge cable etc, - - can even sit that in a bag hang it in the rear - at least the pack is protected -
drill the case for the wires to snake out - charge cable etc, - - can even sit that in a bag hang it in the rear - at least the pack is protected -
Quickie 636 - 230ah LifePo4
- expresso
- Posts: 11985
- Joined: 10 May 2010, 03:17
Re: Step By Step 30ah Pack build with pictures
![]() by snaker » 10 Jun 2017, 02:12
by snaker » 10 Jun 2017, 02:12
@expresso: Can you take and post a pic of the cable that connects between the PSU and the PL8? And what AWG size is it?
- snaker
- Posts: 1259
- Joined: 23 May 2015, 10:45
- Location: Vietnam
Re: Step By Step 30ah Pack build with pictures
![]() by expresso » 10 Jun 2017, 17:22
by expresso » 10 Jun 2017, 17:22
snaker wrote:@expresso: Can you take and post a pic of the cable that connects between the PSU and the PL8? And what AWG size is it?
http://www.progressiverc.com/ec5-charge-cable.html
this connects between my PSU and the charger PL 8 - 10AWG wiring - - there are others that look the same but with 12 AWG wiring - read the specs before you buy - or ask the seller etc, to be sure Get the 10 AWG wiring
i got mines from the above link -
Quickie 636 - 230ah LifePo4
- expresso
- Posts: 11985
- Joined: 10 May 2010, 03:17
Re: Step By Step 30ah Pack build with pictures
![]() by snaker » 12 Jun 2017, 02:14
by snaker » 12 Jun 2017, 02:14
Thanks expresso. My next question  : how did you deal with the ring terminals on the balance wire ends? Were they crimped or soldered or both crimped+soldered?
- snaker
- Posts: 1259
- Joined: 23 May 2015, 10:45
- Location: Vietnam
Re: Step By Step 30ah Pack build with pictures
![]() by expresso » 12 Jun 2017, 02:28
by expresso » 12 Jun 2017, 02:28
i used these - on the balance wires -
i just crimped them - i folded the wire over to thicken it a bit - then put them in this - crimped it down - heatshrink it sealed -
http://www.ebay.com/itm/22-18-AWG-10-ST ... Sw-3FZJw~x
if you feel up to using a bit of solder on it - you can - you would have to use different ring connectors - bare kind - you can crimp and solder it a bit -
then slide your own headshrink over it -
what ever makes you feel comfortable - as long as you crimp; them well and use these 3M with glue when you headshrink it - it seals it - -
i never tired to solder these - maybe i try it one day - i feel good about the crimp and 3M rings - so never worried me - you can try one - and pull on it - see how it feels - how you feel about it - when you connect them to the pack - try to never connect them in a way they would be stressed or yanked on etc,
if of course they are being stressed will raise the chances of having a issue down the line - Try a few both ways with some loose wire before you make the real cable -
Quickie 636 - 230ah LifePo4
- expresso
- Posts: 11985
- Joined: 10 May 2010, 03:17
Return to Everything Powerchair
Who is online
Users browsing this forum: Andrey, anttttttt, LROBBINS and 648 guests