Here is it - i used paper as buss bars -
first pic is the bottom and next is the top - bottom pic has 2 hole buss bars on each end - pos to pos and other end would be neg to neg
three 4 hole buss bars between them
the top gets four 4 hole buss bars and thats it - hopefully this is correct -
Battery ADD on pack - First Attempt -
Re: Battery ADD on pack - First Attempt -
![]() by expresso » 19 Jan 2016, 06:23
by expresso » 19 Jan 2016, 06:23
Quickie 636 - 230ah LifePo4
- expresso
- Posts: 11985
- Joined: 10 May 2010, 03:17
Re: Battery ADD on pack - First Attempt -
![]() by Scollard » 19 Jan 2016, 07:01
by Scollard » 19 Jan 2016, 07:01
expresso wrote:Ok i put it together - i believe this is the way -
First pic is the bottom and next one is the Top
It is incorrect.
You need to do 2 positive, then 2 negative, then 2 positive, the 2 negative, etc. You did 4 positive, 4 negative,etc. Each column must alternate between positive and negative. Should look something like this:
+ - + - + - + -
+ - + - + - + -
The connectivity of the bus bars you did get correct.
- Scollard
- Posts: 258
- Joined: 29 Aug 2015, 01:43
- Location: Seattle, WA
Re: Battery ADD on pack - First Attempt -
![]() by Burgerman » 19 Jan 2016, 11:26
by Burgerman » 19 Jan 2016, 11:26
This will be much safer if you just learn how a battery or cell works hence the link I kept posting you. 
-

Burgerman - Site Admin
- Posts: 71113
- Joined: 27 May 2008, 21:24
- Location: United Kingdom
Re: Battery ADD on pack - First Attempt -
![]() by expresso » 19 Jan 2016, 16:06
by expresso » 19 Jan 2016, 16:06
Scollard wrote:expresso wrote:Ok i put it together - i believe this is the way -
First pic is the bottom and next one is the Top
It is incorrect.
You need to do 2 positive, then 2 negative, then 2 positive, the 2 negative, etc. You did 4 positive, 4 negative,etc. Each column must alternate between positive and negative. Should look something like this:
+ - + - + - + -
+ - + - + - + -
The connectivity of the bus bars you did get correct.
Ok - Got it - will change it later on and take pictures again to make sure - coldest day for the year today and i have to go out for a moment - not looking forward to it -
Quickie 636 - 230ah LifePo4
- expresso
- Posts: 11985
- Joined: 10 May 2010, 03:17
Re: Battery ADD on pack - First Attempt -
![]() by expresso » 19 Jan 2016, 16:15
by expresso » 19 Jan 2016, 16:15
I though it was wrong also - but i didnt know for sure -
if i had to do it alone - One roll of 8 - i would add all 8 Pos on top and all 8 are Neg on the bottom - using the 2 hole buss bars - connect them all along the top and bottom - that would be then 26V 8 Cell pack at 12ah -
i get that much - but get thrown off with the up and down etc, - anyway - this is correct now ?
and the buss bars were correct - so all should be fine once i get them tomorrow - i can connect it - safely of course
Quickie 636 - 230ah LifePo4
- expresso
- Posts: 11985
- Joined: 10 May 2010, 03:17
Re: Battery ADD on pack - First Attempt -
![]() by expresso » 19 Jan 2016, 16:20
by expresso » 19 Jan 2016, 16:20
Burgerman wrote:This will be much safer if you just learn how a battery or cell works hence the link I kept posting you.
yes your are right - and hopefully after doing it more - the full pack etc, after this - i will slowly pick it up - i tend to learn better when i actually do it and see the end result etc, - with Scollard and everyone else helping me here step by step this way - i feel much better about it -
now after this - if i wanted to do the 90ah pack - i would have to make the same thing as now - 2 rolls of 8 - but 4 of them - and connect the buss bars across each of the 4 packs - making one big pack
if i am correct with that - i would need 28 4 hole buss bars - and 32 2 hole buss bars - i may be wrong
this would be for the 90ah pack -
Quickie 636 - 230ah LifePo4
- expresso
- Posts: 11985
- Joined: 10 May 2010, 03:17
Re: Battery ADD on pack - First Attempt -
![]() by Scollard » 19 Jan 2016, 17:00
by Scollard » 19 Jan 2016, 17:00
expresso wrote:I though it was wrong also - but i didnt know for sure -
if i had to do it alone - One roll of 8 - i would add all 8 Pos on top and all 8 are Neg on the bottom - using the 2 hole buss bars - connect them all along the top and bottom - that would be then 26V 8 Cell pack at 12ah -
i get that much - but get thrown off with the up and down etc, - anyway - this is correct now ?
and the buss bars were correct - so all should be fine once i get them tomorrow - i can connect it - safely of course
OK. You are now correct.
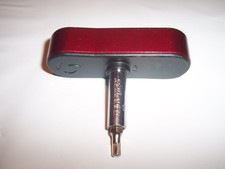
So I would attach the top bus bars first. First set the 3 square 4-hole bus bars, then do the two 2-hole bus bars on the outside cells. You cannot short circuit the battery at this point. So this is relatively safe. I would recommend not wearing any rings or a watch when you are working. I use a T-handle allen key that I've put heat shrink on leaving only a 1/4" of the key exposed. It is impossible to short circuit the battery with this tool as 1/4" will not bridge between batteries. Send a picture once you have the top complete. The we will talk about the bottom.
- Scollard
- Posts: 258
- Joined: 29 Aug 2015, 01:43
- Location: Seattle, WA
Re: Battery ADD on pack - First Attempt -
![]() by expresso » 19 Jan 2016, 18:00
by expresso » 19 Jan 2016, 18:00
You got it - i have a few keys to use - but they are the normal kind - no T handle - but i be fine - i will cover it best i can and use a cloth over the rest of the areas that i am not working on etc,
i wont have the buss bars till tomorrow - and i may wait for my friend helper on friday if i feel i need it - or i may get it done before - now i wont screw it down too tight - because i still need to put the BMS - and i want to use Locktite 242 blue i have only at the very end when its all connected correctly -
then i will do one screw at a time and locktite it down - so a few times i will be removing the screws till its done -
i like this - wish it wasnt so Cold out - i would go looking for a divider - but have to wait for that now -
i post back when i get the top done only first -
Quickie 636 - 230ah LifePo4
- expresso
- Posts: 11985
- Joined: 10 May 2010, 03:17
Re: Battery ADD on pack - First Attempt -
![]() by expresso » 19 Jan 2016, 18:34
by expresso » 19 Jan 2016, 18:34
http://www.amazon.com/gp/product/B000JN ... l_huc_item
would this be ok for cutting the 8 AWG wire i have - if not - what can you recommend that will work -
also this is the crimper i have now - would this also work for crimping the wire lugs at the end also - besides the SB50 connectors -
http://www.amazon.com/Hydraulic-Battery ... ulic&psc=1
i hope i can use this crimper for all my needs -
Quickie 636 - 230ah LifePo4
- expresso
- Posts: 11985
- Joined: 10 May 2010, 03:17
Re: Battery ADD on pack - First Attempt -
![]() by LROBBINS » 19 Jan 2016, 19:05
by LROBBINS » 19 Jan 2016, 19:05
That cutter is not rated for wires fatter than 10 AWG, so no, it's not suitable for 8. The crimper, however, is the right tool to use for the ring terminals as well as for the Andersons. I cut my 10 mm2 (about 7 AWG) wires with either a large regular vice grip pliers or with a wood chisel, mallet and block of wood.
Ciao,
Lenny
Ciao,
Lenny
- LROBBINS
- Posts: 5807
- Joined: 27 Aug 2010, 09:36
- Location: Siena, Italy
Re: Battery ADD on pack - First Attempt -
![]() by Scollard » 19 Jan 2016, 19:43
by Scollard » 19 Jan 2016, 19:43
expresso wrote:http://www.amazon.com/gp/product/B000JNLUQ6?ref_=cm_wl_huc_item
would this be ok for cutting the 8 AWG wire i have - if not - what can you recommend that will work -
also this is the crimper i have now - would this also work for crimping the wire lugs at the end also - besides the SB50 connectors -
http://www.amazon.com/Hydraulic-Battery ... ulic&psc=1
i hope i can use this crimper for all my needs -
I just use a regular diagonal wire cutter or the cutter on my large pliers. It take most of my weight to cut 8 AWG because I am way too weak to cut it with just my hand strength. Crimping is also a big problem for me. I tend to solder when I can.
- Scollard
- Posts: 258
- Joined: 29 Aug 2015, 01:43
- Location: Seattle, WA
Re: Battery ADD on pack - First Attempt -
![]() by flagman1776 » 19 Jan 2016, 19:53
by flagman1776 » 19 Jan 2016, 19:53
I am old school. I like "diagonal cutters" for cutting wires. There are many makes & sizes. My favorites were inhereted... may be 50 years old. Here's an example http://www.amazon.com/Klein-Tools-D228- ... ire+cutter
I like dedicated wire strippers & keep several on hand in convenient locations.
http://www.amazon.com/Klein-Tools-11055 ... +strippers
http://www.amazon.com/Klein-Tools-11046 ... +strippers
I like the more accurate cutter sizes that doesn't nick the conductor...
I have an old favorite pair of combo stripper/crimpers... worn loose over 25 years of professional use... and several replacements that never quite made the grade. http://www.amazon.com/TEKTON-3775-Elect ... +strippers
These days, I mostly use it for crimping small insulated terminals... although I'm moving away from just crimping to solderig & heat shrink tubing for it's greater resistance to corrosion. It will be some time before I know if it proves to be the improvement I expect.
I am using much less electrical tape & more heat shrink tubing...
no longer able to use my TravelScoots
- flagman1776
- Posts: 2309
- Joined: 16 Nov 2012, 16:28
- Location: Rhode Island, USA
Re: Battery ADD on pack - First Attempt -
![]() by Burgerman » 19 Jan 2016, 20:51
by Burgerman » 19 Jan 2016, 20:51
Crimping is also a big problem for me. I tend to solder when I can.
You cannot ONLY crimp. The type of terminal connections we are talking about here are not heavy enough, and require solder. Crimping alone is weak and will fall apart. I crimp, then heat up and solder.
-
Burgerman - Site Admin
- Posts: 71113
- Joined: 27 May 2008, 21:24
- Location: United Kingdom
Re: Battery ADD on pack - First Attempt -
![]() by expresso » 19 Jan 2016, 23:57
by expresso » 19 Jan 2016, 23:57
Ok thanks - i plan on both crimping and solder - i just needed a cutter - i put it all in my wish list - amazon and will make a little order -
my helper and worker - are excited more than me - they both want me to do the whole chair - they cant wait for friday to finish this up
they think i am the smart one - haha - little do they know - i told them - its you guys the smart ones - cant do it without your input and help of course -
what is the size of those allen keys - maybe i can find a T handle for them - add that to my wish list also - for the allen screw on the Cells ?
i have some loose keys - but not sure of the top of my head what size key works - and also for BM - those rubber caps you used on your pack - do you have a link to the size you got - dont want to buy a whole pack and find out its the wrong size -
thanks
Quickie 636 - 230ah LifePo4
- expresso
- Posts: 11985
- Joined: 10 May 2010, 03:17
Re: Battery ADD on pack - First Attempt -
![]() by Burgerman » 20 Jan 2016, 00:09
by Burgerman » 20 Jan 2016, 00:09
Ebay, plastic. CAP SCREW ALLEN BOLT CAPS OR SOMETHING., Don't remember the size.
These?
Now with fuse and plastic caps.
These?
Now with fuse and plastic caps.
- Attachments
-
-
Burgerman - Site Admin
- Posts: 71113
- Joined: 27 May 2008, 21:24
- Location: United Kingdom
Re: Battery ADD on pack - First Attempt -
![]() by expresso » 20 Jan 2016, 00:57
by expresso » 20 Jan 2016, 00:57
nice like the fuse holder -
yes those caps - i find some but cant be sure if they fit - the size etc, -
yes those caps - i find some but cant be sure if they fit - the size etc, -
Quickie 636 - 230ah LifePo4
- expresso
- Posts: 11985
- Joined: 10 May 2010, 03:17
Re: Battery ADD on pack - First Attempt -
![]() by shirley_hkg » 20 Jan 2016, 01:50
by shirley_hkg » 20 Jan 2016, 01:50
- shirley_hkg
- Posts: 4658
- Joined: 31 Dec 2010, 13:42
Re: Battery ADD on pack - First Attempt -
![]() by Burgerman » 20 Jan 2016, 01:51
by Burgerman » 20 Jan 2016, 01:51
I bought a bag of 500 a few years ago. Measure allen key size probably 4mm.
-
Burgerman - Site Admin
- Posts: 71113
- Joined: 27 May 2008, 21:24
- Location: United Kingdom
Re: Battery ADD on pack - First Attempt -
![]() by flagman1776 » 20 Jan 2016, 01:52
by flagman1776 » 20 Jan 2016, 01:52
I bought those same caps on ebay.
http://www.ebay.com/itm/100Pcs-Black-He ... 4d3d72a243
http://www.ebay.com/itm/100Pcs-Black-He ... 4d3d72a243
no longer able to use my TravelScoots
- flagman1776
- Posts: 2309
- Joined: 16 Nov 2012, 16:28
- Location: Rhode Island, USA
Re: Battery ADD on pack - First Attempt -
![]() by Burgerman » 20 Jan 2016, 02:14
by Burgerman » 20 Jan 2016, 02:14
They look different to mine but close enough. They tap in with a hammer and are a b*****d to get out! I think its 4mm could be 5mm you need. But measure allen key.
The bolts have a smaller key than normal allen bolts. So don't just order the M6 ones. And go over every bolt and do them tight. Then do them again. You always miss about 3...
The bolts have a smaller key than normal allen bolts. So don't just order the M6 ones. And go over every bolt and do them tight. Then do them again. You always miss about 3...
-
Burgerman - Site Admin
- Posts: 71113
- Joined: 27 May 2008, 21:24
- Location: United Kingdom
Re: Battery ADD on pack - First Attempt -
![]() by flagman1776 » 20 Jan 2016, 03:41
by flagman1776 » 20 Jan 2016, 03:41
http://www.ebay.com/sch/deede.fulle/m.h ... 2749.l2654 These are my actual purchase.
Description: 100 BLACK SOCKET HEAD COVER CAPS - For Headway LiFePO4 Cell 4mm hex screw
Description: 100 BLACK SOCKET HEAD COVER CAPS - For Headway LiFePO4 Cell 4mm hex screw
no longer able to use my TravelScoots
- flagman1776
- Posts: 2309
- Joined: 16 Nov 2012, 16:28
- Location: Rhode Island, USA
Re: Battery ADD on pack - First Attempt -
![]() by expresso » 20 Jan 2016, 04:35
by expresso » 20 Jan 2016, 04:35
flagman1776 wrote:http://www.ebay.com/sch/deede.fulle/m.html?ssPageName=&_trksid=p2057872.m2749.l2654 These are my actual purchase.
Description: 100 BLACK SOCKET HEAD COVER CAPS - For Headway LiFePO4 Cell 4mm hex screw
thanks - those look nice and good price for 100 - i saved those for the next order i place -
Quickie 636 - 230ah LifePo4
- expresso
- Posts: 11985
- Joined: 10 May 2010, 03:17
Re: Battery ADD on pack - First Attempt -
![]() by expresso » 20 Jan 2016, 05:36
by expresso » 20 Jan 2016, 05:36
shirley_hkg wrote:This add-on really don't need a 8awg wire. 10--12 will be enough.
Hi Shirley - i looked and see i need to make about 2 foot cable to connect it to my chair once its all done -
i already purchased 8 AWG and SB50 for 8 AWG - -
Quickie 636 - 230ah LifePo4
- expresso
- Posts: 11985
- Joined: 10 May 2010, 03:17
Re: Battery ADD on pack - First Attempt -
![]() by Irving » 20 Jan 2016, 16:20
by Irving » 20 Jan 2016, 16:20
Burgerman wrote:They look different to mine but close enough. They tap in with a hammer and are a b*****d to get out! I think its 4mm could be 5mm you need. But measure allen key.
The bolts have a smaller key than normal allen bolts. So don't just order the M6 ones. And go over every bolt and do them tight. Then do them again. You always miss about 3...
Standard ISO M6 Allen Cap head key is 5mm, but I think these are 4mm as used on M6 Allen countersunk head
Don't overtighten - 5Nm max - else you can damage cell. I have one of these torque wrenches from my bike toolkit:
C5/6 A (complete)
Puma 40, 75Ah LiFePO4 (pic is on tour @ Whistler, BC)
Puma 40 backup, 73Ah MK (for now)
Spectra Plus (weedy 40Ah MK)
Puma 40, 75Ah LiFePO4 (pic is on tour @ Whistler, BC)
Puma 40 backup, 73Ah MK (for now)
Spectra Plus (weedy 40Ah MK)
-

Irving - Posts: 2114
- Joined: 04 Dec 2012, 11:51
- Location: NW London
Re: Battery ADD on pack - First Attempt -
![]() by Burgerman » 20 Jan 2016, 19:11
by Burgerman » 20 Jan 2016, 19:11
5Nm is enough as long as surfaces are clean, and you use the blue Loctite.
That all mine are (by my well practised hand torque wrench - lots of experience building of stuff!)
That all mine are (by my well practised hand torque wrench - lots of experience building of stuff!)
-
Burgerman - Site Admin
- Posts: 71113
- Joined: 27 May 2008, 21:24
- Location: United Kingdom
Re: Battery ADD on pack - First Attempt -
![]() by expresso » 20 Jan 2016, 19:45
by expresso » 20 Jan 2016, 19:45
Irving wrote:Burgerman wrote:They look different to mine but close enough. They tap in with a hammer and are a b*****d to get out! I think its 4mm could be 5mm you need. But measure allen key.
The bolts have a smaller key than normal allen bolts. So don't just order the M6 ones. And go over every bolt and do them tight. Then do them again. You always miss about 3...
Standard ISO M6 Allen Cap head key is 5mm, but I think these are 4mm as used on M6 Allen countersunk head
Don't overtighten - 5Nm max - else you can damage cell. I have one of these torque wrenches from my bike toolkit:
thanks - that looks like the one i should get - i checked and its 4mm size that fits - this wrench you can adjust it so it wont overtighten them ?
also - i noticed the Cells turn also when i try to screw it down - whats the best way to keep the cell from spinning as you screw it down ?
i found this Sub 25 shell - was recommended from the place i just called -
this seems to have enough room for the wiring and the exit is wide - i want to order the parts to make the charge cable - balance - i found the correct connector and need to know if this shell is good before i order
http://www.digikey.com/product-search/e ... 16-1014-nd
http://www.digikey.com/product-detail/e ... ND/3078431
http://www.digikey.com/product-detail/e ... ND/3078433
would these parts be correct ?
thanks
Quickie 636 - 230ah LifePo4
- expresso
- Posts: 11985
- Joined: 10 May 2010, 03:17
Re: Battery ADD on pack - First Attempt -
![]() by expresso » 20 Jan 2016, 20:09
by expresso » 20 Jan 2016, 20:09
Irving wrote:Burgerman wrote:They look different to mine but close enough. They tap in with a hammer and are a b*****d to get out! I think its 4mm could be 5mm you need. But measure allen key.
The bolts have a smaller key than normal allen bolts. So don't just order the M6 ones. And go over every bolt and do them tight. Then do them again. You always miss about 3...
Standard ISO M6 Allen Cap head key is 5mm, but I think these are 4mm as used on M6 Allen countersunk head
Don't overtighten - 5Nm max - else you can damage cell. I have one of these torque wrenches from my bike toolkit:
I just ordered that wrench - was the last one on ebay - its worth it - must have if i am going to continue to make packs after this ADD On - better safe than sorry - i also got those rubber caps - the same ones that flagman got -
should be here by next week - and i would be using the locktite 242 once i know for sure thats everything is in correct order - wiring etc, - then will remove one screw at a time - locktite and use the wrench -
how much locktite is needed - just at the bottom of the screw - not the whole screw ?
Quickie 636 - 230ah LifePo4
- expresso
- Posts: 11985
- Joined: 10 May 2010, 03:17
Re: Battery ADD on pack - First Attempt -
![]() by expresso » 20 Jan 2016, 21:36
by expresso » 20 Jan 2016, 21:36
http://www.digikey.com/product-detail/e ... ND/1851326
this one looks to be a nice one - do you think it will fit all the wires ?
to make a charge balance cable like BM Made -
this one looks to be a nice one - do you think it will fit all the wires ?
to make a charge balance cable like BM Made -
Quickie 636 - 230ah LifePo4
- expresso
- Posts: 11985
- Joined: 10 May 2010, 03:17
Re: Battery ADD on pack - First Attempt -
![]() by Burgerman » 20 Jan 2016, 21:37
by Burgerman » 20 Jan 2016, 21:37
Coat the thread right around, about the end 5mm. And crew it in, and tighten fully within say 10 mins.
-
Burgerman - Site Admin
- Posts: 71113
- Joined: 27 May 2008, 21:24
- Location: United Kingdom
Return to Everything Powerchair
Who is online
Users browsing this forum: jehan and 407 guests