I would never use the Cannon plug for this - that microphone plug is best used for microphones and is used on chairs only because it takes very little force to connect it. That's why I'd like to see a zif version of the Anderson developed.
If a microcontroller is used to sense presence of DC, it can also do the inhibit based on that so there's no need for a third contact in the charger lead anyway.
Yes, all the initial set up and Hyperion programming is the same, but afterwards it would be dummy-doable and weak-hand doable.
Ciao,
Lenny
PINNED - Lithium battery conversion/info
Re: Step by step lithium conversion?
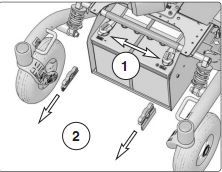
![]() by LROBBINS » 07 Apr 2013, 17:06
by LROBBINS » 07 Apr 2013, 17:06
- LROBBINS
- Posts: 5557
- Joined: 27 Aug 2010, 09:36
- Location: Siena, Italy
Re: Step by step lithium conversion?
![]() by ex-Gooserider » 07 Apr 2013, 23:12
by ex-Gooserider » 07 Apr 2013, 23:12
Burgerman wrote:But it surely doesn't actually help anything.
He still has to configure the charger correctly first. Ie capacity, cell count, charge amps, charge CV point, TVS, timer off, name the memory, etc, and set charger input amp/volt, weather its on board or on a table...
Then additionally wire the thing up on the chair, modify it to work with some extra logic chip to start it, and then after all of that, he still has to plug in the power supply to the wall/chair then push the go button as before? It saves one simple balance connector, while adding a lot of work/complication. And it means finding space for the charger and another box on board the chair and there's not much space..
What am I not seeing? I just don't see how this is easier. But if you guys do, can figure out how to do it, then it will work - just exactly the same!
If having 2 connectors is confusing (!) just use a single one with 11 wires in it... Like a printer parallel port one.
IMHO it does... Certainly it's ideal for the user to program everything, but if necessary a dealer could do the programming - and all of those items are essentially "set ONCE and forget" items. For the person like Nandol or Rachi who is dependent on others, who might or might not be especially well trained or clueful, the less you require them to do the harder it is for them to screw stuff up...
I don't do hobby RC stuff the way that you do - and neither do most of us. As I've said before I have a dedicated charger for each of my rechargeable devices, and / or an easier way to charge than the Hyperion (i.e. I can plug my cell phone into my laptops USB port - takes one 6" cable that lives in my carry bag...) so the ONLY thing the Hyperion would be used for is charging the chair, I have NO NEED for 20 memory slots, or even two. I just need the one setup for whatever battery pack is in the chair...
I can push the start button, but if I'm mounting it in the chair (which has the advantage of making the charge and balance leads really short) then it would be nice - not essential - for the charger to start as soon as I plug in a power source. (I have mixed feelings about the inhibit part)
ex-Gooserider
-

ex-Gooserider - Posts: 5975
- Joined: 15 Feb 2011, 06:17
- Location: Billerica, MA. USA
Re: Step by step lithium conversion?
![]() by rollingcowboy » 08 Apr 2013, 09:07
by rollingcowboy » 08 Apr 2013, 09:07
all of the onboard chargers that I have seen are sealed units.
would the hyp. - or any other hobby - charger be up to the rigors of life on a moving, crashing and bashing powerchair?
it would fill up with dust out here in the high desert if not sealed.
would the hyp. - or any other hobby - charger be up to the rigors of life on a moving, crashing and bashing powerchair?
it would fill up with dust out here in the high desert if not sealed.
- rollingcowboy
- Posts: 347
- Joined: 16 Feb 2012, 08:56
- Location: Denver, CO
Re: Step by step lithium conversion?
![]() by Burgerman » 08 Apr 2013, 09:12
by Burgerman » 08 Apr 2013, 09:12
I think you would need to dispose of the casing, just use its innards and use a full metal shell with external heat sinks and no fans.
-

Burgerman - Site Admin
- Posts: 65411
- Joined: 27 May 2008, 21:24
- Location: United Kingdom
Re: Step by step lithium conversion?
![]() by Step » 08 Apr 2013, 09:31
by Step » 08 Apr 2013, 09:31
Doesn't the Hyperion need a power supply as well?
I thought you couldn't plug it straight into a power outlet...
I thought you couldn't plug it straight into a power outlet...
- Step
- Posts: 619
- Joined: 12 May 2011, 16:24
- Location: Belgium
Re: Step by step lithium conversion?
![]() by Burgerman » 08 Apr 2013, 09:44
by Burgerman » 08 Apr 2013, 09:44
You cant. It needs 9 to 28 volts via a car or power block. This is why I don't really see what is being gained.
All you really gain is one connector with 2 wires, rather than one with 11 wires.
Still one connector. (or 2 if you keep power and balance plugs separated).
All you really gain is one connector with 2 wires, rather than one with 11 wires.
Still one connector. (or 2 if you keep power and balance plugs separated).
-
Burgerman - Site Admin
- Posts: 65411
- Joined: 27 May 2008, 21:24
- Location: United Kingdom
Re: Step by step lithium conversion?
![]() by ex-Gooserider » 09 Apr 2013, 08:31
by ex-Gooserider » 09 Apr 2013, 08:31
Other than shortening up the charge and balance leads, I don't see a huge advantage to having an on-board version of the Hyperion, but it wouldn't be a bad thing either...
Aside from simplifying the use by getting rid of the extra memory slots, and maybe the start button stuff, my big desire would be for a version with an integrated AC supply - possibly detachable and / or with a DC input option as well, but IMHO if doing lithium it is less critical to be able to charge from the car. I mostly want to be able to charge from a wall socket wherever I'm using the charger, and it is more of a pain to have to haul around both the Hyperion and a bench supply - not to mention that the combination probably is heavier and bulkier than an integrated unit would be....
ex-Gooserider
-
ex-Gooserider - Posts: 5975
- Joined: 15 Feb 2011, 06:17
- Location: Billerica, MA. USA
Re: Step by step lithium conversion?
![]() by Burgerman » 09 Apr 2013, 09:12
by Burgerman » 09 Apr 2013, 09:12
I mostly want to be able to charge from a wall socket wherever I'm using the charger, and it is more of a pain to have to haul around both the Hyperion and a bench supply - not to mention that the combination probably is heavier and bulkier than an integrated unit would be....
Remember though that you should have 2 to3x the range if you implement the lithium's properly. And they don't much care about being discharged heavily, and performance remains normal up until the end. So the need to keep shoving some power back in at every stop is pretty much gone. So portability becomes far less important.
And the reason that the chargers power supply must be big, is that you will be returning 2500 to 3000 watt hours rather than 1000 lead watt hours if discharged. In the same or less time. Albeit at a very constant full power right to the end unlike the lead that goes slower and slower. A typical 8 amp wheelchair charger is around 285 watts. The Hyperion needs 700 watts to charge at full power as its got to replace up to 3x as much power.
-
Burgerman - Site Admin
- Posts: 65411
- Joined: 27 May 2008, 21:24
- Location: United Kingdom
Re: Step by step lithium conversion?
![]() by ex-Gooserider » 10 Apr 2013, 07:05
by ex-Gooserider » 10 Apr 2013, 07:05
Agreed, it is probably less of an issue to do charging at every chance with Lithium, but some of us stone-age types are still running on lead, at least until those die and we need to replace with something better...
Also I do occasionally travel away from home long enough that I'd want to take the charging setup with me - especially since traveling is likely to involve unusually long distances in the chair because one is doing touristy things or even just running around airports and other strange places... Especially if flying, portability is important...
Even if not doing something onboard, you also still have the use case of needing to have the charging system operated by less than clueful caregivers - in which case everything one can do to eliminate steps is helpful - plugging in one connector is harder to mess up than plugging in two... Getting rid of the start button is one less thing for them to forget to do, and so on...
As it sits, the Hyperion is a wonderfully flexible and versatile device, but with a very complex user interface. If one doesn't need the flexibility, the complex interface is more of an annoyance than a help, so it seems to me like it would be good to have a "dumbed down" version that only did one thing, but did it very simply and easily...
ex-Gooserider
-
ex-Gooserider - Posts: 5975
- Joined: 15 Feb 2011, 06:17
- Location: Billerica, MA. USA
Re: Step by step lithium conversion?
![]() by Burgerman » 10 Apr 2013, 09:43
by Burgerman » 10 Apr 2013, 09:43
If is only for lead, then there are thousands of chargers that are already dumb. And these only need one connector anyway. On or off board.
If it was a travel chair, brushless, lightweight, small lithium battery, and if it was 12 noon all day, clear sky, and if solar panels were 100 percent efficient (they are just 16 to 18 percent at best if you buy the best commonly available ones) then 1 solar panel of 1 meter square would keep up almost! As long as you were in the open, no shade. Think big door type area on a public building.
Unfortunately as it stands that wont work! You wouldn't get a quarter of what you need. In fact you would need at least 3 of my huge roof panels in direct sun, carefully orientated and that's as big as a wall. But the future holds some promise in sunny weather.
-
Burgerman - Site Admin
- Posts: 65411
- Joined: 27 May 2008, 21:24
- Location: United Kingdom
Re: Step by step lithium conversion?
![]() by Burgerman » 10 Apr 2013, 14:09
by Burgerman » 10 Apr 2013, 14:09
These are the 2 connectors I use now.
The BLACK one is 15 pin, easy to insert, and has the balance connections. Small gauge wires for a 13 in series 78 cell pack.
The Grey/Black one is the charge connector. An Anderson. Slightly harder to connect. But these are also available as low insertion force.
Both will be firmly bolted under the seat edge eventually. This is simple, cant be connected wrongly, and the charge cable/balance cable can both be heat shrunk or taped together as one if you prefer.
Alternatively just use one single connector with all wires in it. There no real need or much advantage with heavy charge cables on lithium.
- Attachments
-
- D8E_2502.JPG (147.31 KiB) Viewed 16447 times
-
Burgerman - Site Admin
- Posts: 65411
- Joined: 27 May 2008, 21:24
- Location: United Kingdom
Re: Step by step lithium conversion?
![]() by Sully » 15 Apr 2013, 16:25
by Sully » 15 Apr 2013, 16:25
Really a nice neat well organized plan. Excellent!!!!
- Sully
- Posts: 2223
- Joined: 04 Dec 2010, 18:44
- Location: Hampstead, North Carolina, USA
Re: Step by step lithium conversion?
![]() by Burgerman » 16 Apr 2013, 10:41
by Burgerman » 16 Apr 2013, 10:41
Been driving the Lithium BM3 about in my street. Temporary wiring, and again via RC while sat in it.
I forgot how fast 15mph is! It whines at high pitch. Or how hard it can accelerate. Its as mad as a box of frogs... I just love it! Of course you don't have to go fast.
Motors not even warm. You can overtake cyclists
GOOD Roads new footpaths very smooth. Bad roads or footpath you need to slow down or it hurts! Now my 6mph chair feels as if its broke.
Now, just got to sort out the joystick (analog multicore, programming, and pod/switches/lights etc), fuses, circuit breaker, brakes, lights, finish seating etc... All horrid fiddly bits that need to be very right first time.
-
Burgerman - Site Admin
- Posts: 65411
- Joined: 27 May 2008, 21:24
- Location: United Kingdom
Re: Step by step lithium conversion?
![]() by LROBBINS » 16 Apr 2013, 14:30
by LROBBINS » 16 Apr 2013, 14:30
John,
Is there a helmet law in England? Sounds like you should be wearing one, whether legally required or not!
Ciao,
Lenny
Is there a helmet law in England? Sounds like you should be wearing one, whether legally required or not!
Ciao,
Lenny
- LROBBINS
- Posts: 5557
- Joined: 27 Aug 2010, 09:36
- Location: Siena, Italy
Re: Step by step lithium conversion?
![]() by Burgerman » 16 Apr 2013, 15:22
by Burgerman » 16 Apr 2013, 15:22
There's nothing in there to damage.
Currently building a stainless frame for 4x 250 watt solar panels, so cant finish it just yet. This is made from 2.5 inch OD exhaust pipe tube, and blocks of black nylon, threaded on my lathe etc... And some sand/cement.
Need to turn more free sky power into reducing my bills!
At the moment its doing about 1/3rd my power daily. This extra 4 panels will give me enough to more than half my bill. Long after work/cost is forgotten the free electric keeps coming...
Note use of Andersons and cheap non armoured shower cable (6.0mm2) because I have a roll...
http://www.wheelchairdriver.com/images-solar-frame
-
Burgerman - Site Admin
- Posts: 65411
- Joined: 27 May 2008, 21:24
- Location: United Kingdom
Re: Step by step lithium conversion?
![]() by rollerderby » 17 Apr 2013, 02:15
by rollerderby » 17 Apr 2013, 02:15
Very cool. What's your average insolation?
Jack
Jack
- rollerderby
- Posts: 20
- Joined: 04 Apr 2013, 00:18
- Location: Western Louisiana
Re: Step by step lithium conversion?
![]() by Burgerman » 17 Apr 2013, 06:37
by Burgerman » 17 Apr 2013, 06:37
-
Burgerman - Site Admin
- Posts: 65411
- Joined: 27 May 2008, 21:24
- Location: United Kingdom
Re: Step by step lithium conversion?
![]() by Simple Don » 06 May 2013, 01:22
by Simple Don » 06 May 2013, 01:22
I have just bought a Permobil C350 chair use as the basis of my project chair. The chair is a rear wheel drive, 7.5 mph version with two group 34 batteries. My charger says that they are close to the end of their service life. The obvious place to start would be a lithium conversion.
I have read through this thread and it seems pretty straight forward. I have only two questions right now.
One, if I am going to eventually go to a nominal 48 volt to gain speed why wouldn't I just build two 24 volt batteries now and connect them in parallel until I am ready to buy a new controller and drive the motors at 48 volts? If I build two 12 volt batteries they will have to be reconfigured to two 24 volt batteries to produce the 48 volts.
Also, a question for Burgerman, are you a Hull City follower? If so congratulations on their promotion.
- Simple Don
- Posts: 7
- Joined: 01 Dec 2012, 02:46
- Location: Atlanta, USA
Re: Step by step lithium conversion?
![]() by Burgerman » 06 May 2013, 01:39
by Burgerman » 06 May 2013, 01:39
Football? Not me...
Yes you could build lithium's as 24 or 12v packs.
Wouldn't much matter. You can reconfigure them later on too if needed. Unless cell count stops it working out well. E.g. 6 X 6 cells per battery gives 2 packs of 12v. 72 cells total. 36 CELLS PER BATTERY.
You cant divide 36 by 8... So the best simple grp 24 swap at 240mm long, 240mm high, 172 wide cant be used for e.g.
Grp 34s are a lot small for 7.5mph geared powerchair. Range and battery service life will be a bit dismal. Are you sure grp24s do not fit the same space or is it a seating thing (lower batteries)?
Yes you could build lithium's as 24 or 12v packs.
Wouldn't much matter. You can reconfigure them later on too if needed. Unless cell count stops it working out well. E.g. 6 X 6 cells per battery gives 2 packs of 12v. 72 cells total. 36 CELLS PER BATTERY.
You cant divide 36 by 8... So the best simple grp 24 swap at 240mm long, 240mm high, 172 wide cant be used for e.g.
Grp 34s are a lot small for 7.5mph geared powerchair. Range and battery service life will be a bit dismal.
-
Burgerman - Site Admin
- Posts: 65411
- Joined: 27 May 2008, 21:24
- Location: United Kingdom
Re: Step by step lithium conversion?
![]() by ex-Gooserider » 06 May 2013, 07:17
by ex-Gooserider » 06 May 2013, 07:17
Also note that at least with the current Roboteq models, you need to run 42 volts (nominal) NOT 48... This is because the Roboteq errors and quits around 50V, and between the fact that a fully charged LiFePO4 pack is slightly over 48 real volts, and the potential for regenerative braking on ramps and such, you don't have enough "headroom" for safe operation with a 48V pack....
This means that you need to reconfigure the packs as it doesn't work to just hook two 24V packs up in series, as that gives the wrong total...
A 24V pack is going to be 8 cells serial X some number of parallel, so putting them in series will give 16S X ?P in effect. BM's pack is only 13S, for a nominal 42V, which is enough for headroom on a Roboteq, but you need to reconfigure to get it...
ex-Gooserider
-
ex-Gooserider - Posts: 5975
- Joined: 15 Feb 2011, 06:17
- Location: Billerica, MA. USA
Re: Step by step lithium conversion?
![]() by Burgerman » 06 May 2013, 11:27
by Burgerman » 06 May 2013, 11:27
13S which I use charged to 3.65v per cell gives 47.45 volts. Drops to 42 to 45v in use.
-
Burgerman - Site Admin
- Posts: 65411
- Joined: 27 May 2008, 21:24
- Location: United Kingdom
Re: Step by step lithium conversion?
![]() by Simple Don » 06 May 2013, 13:00
by Simple Don » 06 May 2013, 13:00
Burgerman wrote:Grp 34s are a lot small for 7.5mph geared powerchair. Range and battery service life will be a bit dismal.
The C350 main chassis is a simple rectangular box with everything bolted on to it. I haven't done too much to disassemble it beyond taking the battery covers off. The main problem gaining the needed 25 mm is in the front where there is an approximately 15 mm dia. torque tube running across the top of the battery that the tops of the two front shocks are attached to. A picture is worth...
I haven't removed the battery yet. I need help to do it. But there probably will be room for the group 24 LiFePO4 stack but not the lead battery because of the clearance needed for the lead battery terminals.
- Simple Don
- Posts: 7
- Joined: 01 Dec 2012, 02:46
- Location: Atlanta, USA
Re: Step by step lithium conversion?
![]() by Burgerman » 06 May 2013, 13:22
by Burgerman » 06 May 2013, 13:22
Measure it.
A group 24 can be UP TO 245mm tall. Inc terminals. Most are not esp when used in powerchairs, and many are also using a flat threaded hole for a terminal.
A 6 cell tall lithium pack is exactly 240mm tall.
The best battery option then is a 68Ah group 34 Odyssey. Its lower, and has a USABLE accessible capacity greater than most 70Ah or bigger Group 24s.
-
Burgerman - Site Admin
- Posts: 65411
- Joined: 27 May 2008, 21:24
- Location: United Kingdom
Re: Step by step lithium conversion?
![]() by Simple Don » 07 May 2013, 23:38
by Simple Don » 07 May 2013, 23:38
Good information, thank you.Burgerman wrote:Measure it.
A group 24 can be UP TO 245mm tall. Inc terminals. Most are not esp when used in powerchairs, and many are also using a flat threaded hole for a terminal.
A 6 cell tall lithium pack is exactly 240mm tall.
The best battery option then is a 68Ah group 34 Odyssey. Its lower, and has a USABLE accessible capacity greater than most 70Ah or bigger Group 24s.
- Simple Don
- Posts: 7
- Joined: 01 Dec 2012, 02:46
- Location: Atlanta, USA
Re: Step by step lithium conversion?
![]() by CPguy » 11 Jun 2013, 14:18
by CPguy » 11 Jun 2013, 14:18
My dreaded metal battery box has the following inner dimensions: 16 cm high, 25,5 cm wide and 36,5 cm long.
My question to all Headway cell users: What are the exact dimentions of the various HEADWAY cells (10 Ah, 12 Ah and 15 Ah which apparently replace the older 16 Ah cells) with the plastic holders and screw terminals please?
I fear that my battery box has such dimentions that there will always be some free space...
Thank you for all measurements beforehand.
- CPguy
- Posts: 610
- Joined: 22 Jan 2010, 14:20
- Location: Vienna, Austria (Europe)
Re: Step by step lithium conversion?
![]() by Burgerman » 11 Jun 2013, 16:22
by Burgerman » 11 Jun 2013, 16:22
You need to get creative.
Is it one single exactly "square" space?
My BM3 centre section is exactly 175mm wide, inside. 174 after powder coating.
That fits the width of the 12Ah cells, with plastic building blocks perfectly.
1mm less and it will not work. 1mm more and it will be able to move and rattle about. 175 gives a perfect fit to both the headway cells, the group 24 MKs, the PC1500 Odyssey, and to 3x 42Ah odyssey batteries on end.
Height is 248 mm to the 16mm horizontal bar that fits inside the back as a spacer/support. (6 cells is 240 high with blocks)
Length is correct for 13 cells long. (I use 13 in series (long) and 6 in parallel (high).
Adequate (just) for 2x PC1500s Odyssey*. Or 2 MKs. Or 3x 42Ah Odyssey on end for 36 volts.
If you fit 2x 6x6 12v blocks for a 108Ah 24v lithium system you will have the correct height, width, but an extra 60mm length unused.
Hope that helps! It was designed for these 4, 24, 36, and 45 volt lead/lithium battery options. Took much maths and head scratching!
It also means with 3mm alloy walls you need to cut 181mm out of the frame to fit. 2mm steel, cut 179 out. Its not critical though as the frame can be flexed about 2mm.
http://www.wheelchairdriver.com/BM-MK3- ... rchair.htm Scroll, look carefully...
*Order marine version or top terminal only version (marine is PC1500M) or just trim off side terminals with a hacksaw neatly. Very easy. All same battery.
-
Burgerman - Site Admin
- Posts: 65411
- Joined: 27 May 2008, 21:24
- Location: United Kingdom
Re: Step by step lithium conversion?
![]() by Burgerman » 11 Jun 2013, 16:35
by Burgerman » 11 Jun 2013, 16:35
Simple answer to your question is WITH BLOCKS each is 40.0 x 40.0 x 171(+/-2) for 12Ah.
-
Burgerman - Site Admin
- Posts: 65411
- Joined: 27 May 2008, 21:24
- Location: United Kingdom
Re: Step by step lithium conversion?
![]() by CPguy » 13 Jun 2013, 08:00
by CPguy » 13 Jun 2013, 08:00
@ BM: Thank you very much for your input and the measurements. You are simply the best!
- CPguy
- Posts: 610
- Joined: 22 Jan 2010, 14:20
- Location: Vienna, Austria (Europe)
Re: Step by step lithium conversion?
![]() by cdb0ewm » 26 Jun 2013, 01:58
by cdb0ewm » 26 Jun 2013, 01:58
I would live your input on the following:
Considering doing a Headway powered chair. I don't really need to go 15mph, I would be happy with 9 or 10 mph.
Should I go with a 36v or 48v system.
I'm not really up to speed on the number and configuration of the cells for either voltage systems from a packaging, wiring and balancing perspective.
You mention several times that to do this right there is lots to learn. Can you point me to a source so I can learn what is necessary
Thanks
- cdb0ewm
- Posts: 156
- Joined: 23 Jun 2013, 23:44
Re: Step by step lithium conversion?
![]() by Burgerman » 26 Jun 2013, 02:23
by Burgerman » 26 Jun 2013, 02:23
Unless you are using a controller that will not turn to smoke at 36 volts then your only choice is 24 volts.
The ONLY place you will likely learn anything useful about batteries and charging that is mobility related is right here and maybe "battery university" but their lithium info is a bit outdated... And mostly refers to laptop style lithium ion batteries. And possibly the e-bike forums, as long as you can pick the 1 in 50 posts that comes from someone that "gets it". The rest is confused rubbish...
Its a HUGE field. I could write 1000 pages. In fact I have! And some 13,600 posts here of of 42,000!
What specifically do you need to know? I think you need to understand a lot about power chairs and controllers and lead batteries motors etc, and all the issues and the relationship between these parts and the compromises. Before you think about moving to non plug and play lithium's.
-
Burgerman - Site Admin
- Posts: 65411
- Joined: 27 May 2008, 21:24
- Location: United Kingdom
Return to Everything Powerchair
Who is online
Users browsing this forum: acid_coke, Jay_x, mentado020477, rickystyx, Velcrohead and 53 guests