 MK
3 Version - A Unique Compact FAST Powerchair! 15 MPH
MK
3 Version - A Unique Compact FAST Powerchair! 15 MPH
Part
1
2 3 4 5 6
Brochure! &
Controls
Mk1 |
Mk2 |
Mk3 versions +
Timeline
The previous page
1
shows a few components gathered together to build this
superior fast powerchair.
This page shows a few more! Rather than buy a used donor chair
to cut up as I usually do, I bought just a main frame, and a basic seat frame.
And the caster forks. The ONLY parts of the donor chair I actually use. And
these parts are modified too as you will see.
The main frame for e.g. has to have a chunk cut out to allow
me to fit my new longer thinner battery and motor mounting "part" or rather
a complete fabricated centre section This allows me to fit three batteries
and my bigger faster motors and STILL keeps total powerchair size exactly the
same as the tiny
Mk2 version.
This allows the motors to be moved inboard, and the batteries to
be turned around, and lithium batteries fitted longitudinally. Target width is still just 25.5 inches or
less. Even with 12 inches of fat all terrain tyres. So that it is STILL compact
and BETTER indoors than other less capable commercial hi-end powerchairs.
With that in mind I cut 179mm out of the used frame as seen in
the following image.

Freehand but carefully measured! 179mm to allow 1mm of filing to
correct any inaccuracy. Nice colour! Soon be powder coated black... I can
cut straight. Most people cant so the bit below had some tape wrapped around it
as a guide. I only did the first cut. My carer Brain did the second one...

Done! This gap will be 181mm once tidied up. Why? Because that's
the width of the battery, metal sides to the battery box to be fitted, allowing for some free clearance,
that I will make next!

How do I design the new centre section? Well its not going to be
made from wood!
I think very carefully about the exact motor positions, how they
will attach etc and required strength, as well as where the C of G will finish
up. I look up the total MAX battery dimensions and weight of the lithium pack I
will be using.

Other way around!
And I need to keep the caster wheels from hitting the new centre
section, as well as the total wheelchair length as short as possible. (about 35
inches including footplate) And total width down to 25.5 inches or less
INCLUDING the fat off road tyres to be used. So what looks like a simple thing
actually really isn't... Its a lot of extremely careful juggling of figures in
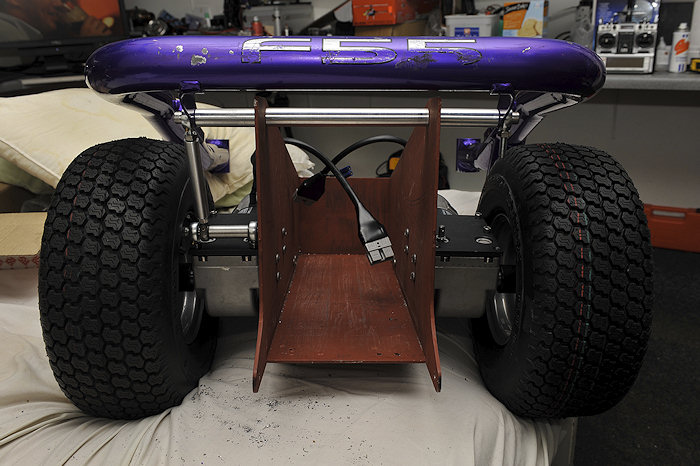
my head. And as a proof of concept its easier to build a simple ply mock-up to
be sure I am happy with everything. E.G. the rear anti tip wheel height, was
just changed too allow wilder wheelies!
OK that took hours... Now I just need to order some 4mm steel and
TIG weld it all together. Actually I just gave the plywood model to my local
engineering shop with a full page of measurements to copy. Since I wanted two
making and its hard work if you are doing this in a bedroom!. Remember its
always cheaper and faster to do two at once. It is almost as cheap as doing just
one.
OK two centre sections done!
Not bolted in but propped in place here badly!

Total width 25.7 with these tyres. And 25.25 with the 145/70 - 6 all terrain
tyres.

Motor angle. Well almost this is just stood here on my bed and a drink can! But
you get the idea.

From another angle.

There will be a steel block mounted by bolts or welded to the
side here for strength.
For anyone following this build
here are some beer mat engineering drawings for some more parts required.
I am building 2 chairs so there are double the quantities you will need here!
Parts


More soon!.
Part
1
2 3 4 5 6
Brochure! &
Controls
Mk1 |
Mk2 |
Mk3 versions +
Timeline
