
145-70 - 6 off road &
15x6.00 - 6 lawn tyre medium |
145-70 - 6 off road & 15x6.00 - 6 lawn tyre
large
Compared both side by side. The
off road style tyre which is 145/70-6 (for the winter for grip in snow mud
and soft ground) and the "lawn" tyre (Kenda Turf) which is 15x6.00 - 6
for summer use. A different imperial
sizing system is used. These actually measure 14.75 inches when fitted and
inflated to 6 psi.
They are almost the same actual size and pretty much
interchangeable (for our off road powerchair use) on our 6 inch diameter x 4.5
inch wide wheel rims.
The squarer lawn tyre is a nominal claimed 15 inch total
diameter and the off road Quad bike tyre is 14.5 inches. That's a 1/4 inch or
6mm ride height change in use. Which can be ignored usually as long as you have
6mm clearance.
Its the same story with the width as the lawn tyres are a total of
1/4 inch or 6mm wider according to my ruler. That's about 3mm or 1/8 inch wider
each side. So it too isn't important. Both of these tyres are 4 ply
(stronger than 2 ply which is most powerchair and mobility tyres) and tubeless
should you wish to use them on a tubeless rim as I do.

Puncture
resistant tyre casing medium |
Puncture resistant
tyre casing large
The grass / mower / golf kart tyres
are designed for us! Puncture resistant tyre casings are available at a
small extra cost. Ask yourself,
why on earth don't the manufacturers all fit things like this as standard?
Maybe
they don't care if we get stuck with no hope of rescue in a strange town at 2am.
They will fit solid tyres but they are crap! Greater rolling
resistance and much harsher ride and my back cant stand that.
After all I just took me about ten mins finding these.
And they are grey which looks "disabled" before it goes yellow a few weeks later
and looks old too. Black tyres look better, and stay looking better with a quick
wash and some tyre treatment (foam in a can!)
How puncture resistant? Well I found a forum post showing
someone trying to puncture an old one from his dads mower with a scalpel just
out of interest and he struggled. And they are not even half as expensive as
the nasty "mobility" grey
tyres... Have you ever noticed how that word "mobility" doubles the price?
OK black tyres do mark carpets if they are wet. Or if the carpet is wet. So be
careful! I have a fully carpeted house (Bungalow actually) and white paints. There isn't a tyre mark
anywhere and I have used black tyres for 12 years.

Fitting Motors
medium |
Fitting Motors
large
New 4 pole motors/gearboxes fitted
(with modified cush drives) so they don't fail as usual. And the alloy bars,
rose joints etc. All freshly powder coated and alloy so light. And the
battery door complete with some reflectors as I don't want to die on the way
back from the pub!

Adjustable rods
detail medium |
adjustable rods detail
large
Some better detail of the adjustable
length rods that allow the ride height to change as I need. Of course
that would mean a new battery door too! But if I need to change it I can.
Its set at the height its is because it then matches my other two powerchairs
exactly. For transfers and because it has to allow =me to drive from it. All
alloy, stainless polished bolts and powder coating of course! I want this thing
to wash clean after the worst of the winter has had a go! Shame the "real"
manufacturers don't do the same.

fitting
wheel medium |
fitting wheel
large
Fitting the Tubeless (less punctures)
and Kevlar lined (even less punctures!) tyres and powder coated wheels onto my
home made adapters with polished stainless steel bolts.
No rough work here! I leave cheap thin painted finish and steel
greaseless bolts and tubed 2 ply tyres to the manufacturers...

interior detail medium |
interior detail large
An "internal" view. As you
can see the vast majority of the original powerchair has been thrown away. Only
the main frame (the tubular bit) is original powerchair in this picture. And the
4 pole motors. But even the frame and the motors are modified a little...

Wheel
medium | Wheel
Large
Wheel centre caps machined from solid,
(my trusty old lathe) but alloy so fairly light. Held on with a tapered
countersunk Allen bolt as this centralises it.

Caster
wheel medium | Caster wheel
large
Front wheel. The wheel is
from a "minibike" - cheap light and better designed - off the bay of E.
The bearings are Stainless steel. So they don't corrode and fail when they get
water in them due to hair getting wrapped around the shaft. This is a common
occurrence and I have heard many powerchair users complain about this.
The wheels are powder coated of course, as are the alloy
spacers... And the brand new caster forks are as well. They arrive with a thin
dull coat of paint. They too use Stainless steel bearings in the frame. I
don't like corrosion and since these bearings are as cheap on eBay as the steel
versions why not? . The wheel half bolts and the bolts holding the shaft are
stainless steel.
The washers are anodised aluminium alloy. They will be
black too when they arrive... The casters are
modified, as the wheel shaft is now10mm stainless steel and it now passes through the caster forks
after drilling. This means all the loads go direct from the shaft to the caster
fork. The stock setup was designed by my mum. It puts all the loads through the
bolt which then "had a tendency" unsurprisingly to come loose... So in true
wheelchair style they added a tab washer to stop it coming undone rather than
fixing the real problem... A rusty hex bolt and tab washer looks great! Not. And
we pay as much for a powerchair as a small car...

Powerchair off
road part built medium |
Powerchair off road part
built large
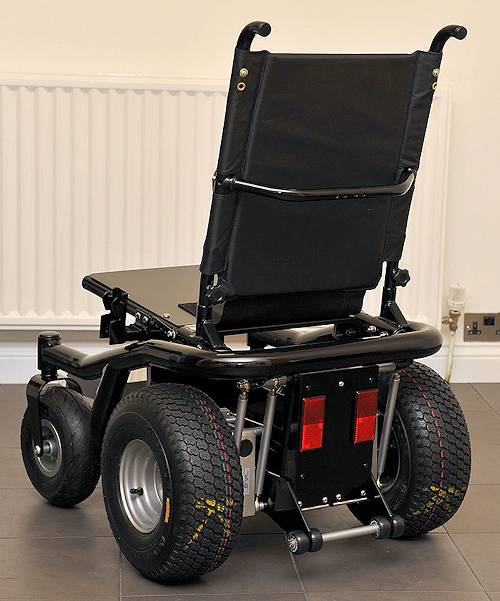
So that leaves us up to here!
Time for the pub. More tomorrow. These tyres by the way are my "dry" tyres. The
real off road ones are for winter. They are the same size and I have two sets of
wheels so will just swap over for the winter in about October... They will
still have the "balloon tyres smooth ride" with those soft sidewalls and will be
just as good on soft ground with great floatation at say 5 psi. I still cant
believe its only a fraction over 26 inches (26.25) with these huge tyres on.
Since they are 6 inches wide rather than the 145mm wide with the other off road
tyres further up the page. But it is according to my ruler.

We got the seat and backrest and all of its various brackets and
other parts crewed together! And fitted. All of about ten minutes! And the home
made footplate is also reassembled and adjusted. All of these parts -- even
where brand new -- have been heavily powder coated and all assembled with
polished stainless steel bolts. It will look good for longer than I am around...

Looks strange at the rear without those lights fitted behind the
seat. Leaves a big open space. They will be last. Notice the new anti tip wheels
fitted to the shortened mountings. Every inch of manoeuvrability matters hence
the smaller wheels and the shorter distance behind the wheelchair. Also notice
that the most rearward part of this powerchair is my head. No great big box
hanging out of the rear like some powerchairs...

And the arms once fitted measure 26.25 inches wide max, the same as the tyres do
from side to side. So the whole chair is narrow too. And it has no corners...
Look at the tiles. 12 inch square. It fits inside of two tiles and only
the bulge of the sidewalls protrudes. That's narrower than most normal
outdoor/indoor powerchairs. Even with the fat tyres.

Something wrong with the photos colours here but you get the
idea! Its minimalist light as possible and still needs its arms, a cushion, its
batteries etc etc... Will look better soon! But look at that huge squashy
sidewall. That tyre inflates to about 4 to 5 psi in use. It gives the sort of
ride I have dreamed of for years in an all day powerchair. Smooth. I have tested
a dozen so called "suspension" powerchairs. Its all marketing they barely work.
These tyres deform so much over say a hammer left on the workshop floor that the
chair doesn't rise as it rolls over it. Is as if its not there. That's got to
give a smother ride over any surface than normal "hard" thin tyres do on a
normal powerchair.

Anyone worried about the complexities of powerchair wiring
needn't be! This is half of it... These bolt to your batteries and plug
into the mysterious complicated "module" under the seat! That's half the wiring
done then...

The other half consists of two equally simple plug in bits of cable that go from
that same module to the motors... Then plug in your control pod and away you
go... You cant even do it wrong as the plugs are all different. Well ok you can
plug the wrong motors in (reversed) or one motor the wrong way around but you
soon figure out that's wrong as you spin in circles or go in reverse instead of
forwards... Really all the complex talk by the manufacturers and tech guys is
bull.

Here's that mysterious controller module! In this case its a
Penny and Giles 100 amp "Pilot Plus" with some extensive reprogramming at the
OEM level. To make it do what I want rather than what some safety Nazi thinks I
should want.
Basically it now works proportionally and accurately with zero
damping or delay on all parameters. For details see the original powerchair
pages (Page 6 I think...) Its mounted
on a custom plate under the seat on the modified seat frame... This is looking
upwards from the footplate.
(Part
1
|
2
| 3 )
To see
how and why + what was
involved see the previous sections! To see it finished see the last
section...
And the MK1
Original Powerchair build here - all 6 pages!
Lithium Ion Batteries for
Powerchairs and Scooters


